심심해서 짤 생성기를 만들어보았다.
나한테 제일 익숙한 react로 할까 했으나 최근에 vue를 하게 되었기 때문에 vue를 사용해보기로 했다.
react 의 cra처럼 vue도 간단하게 프로젝트를 생성해주는 명령어가 있다.
근데 우선 vue-cli 가 깔려있어야함
vue-cli 설치
npm install -g @vue/cli
# OR
yarn global add @vue/cli
project 생성
vue create my-project
# OR
vue ui
sass 설치, element-ui 설치
기본 플로우
간단한 사이드프로젝트라 그렇게 복잡하지는 않다.
-
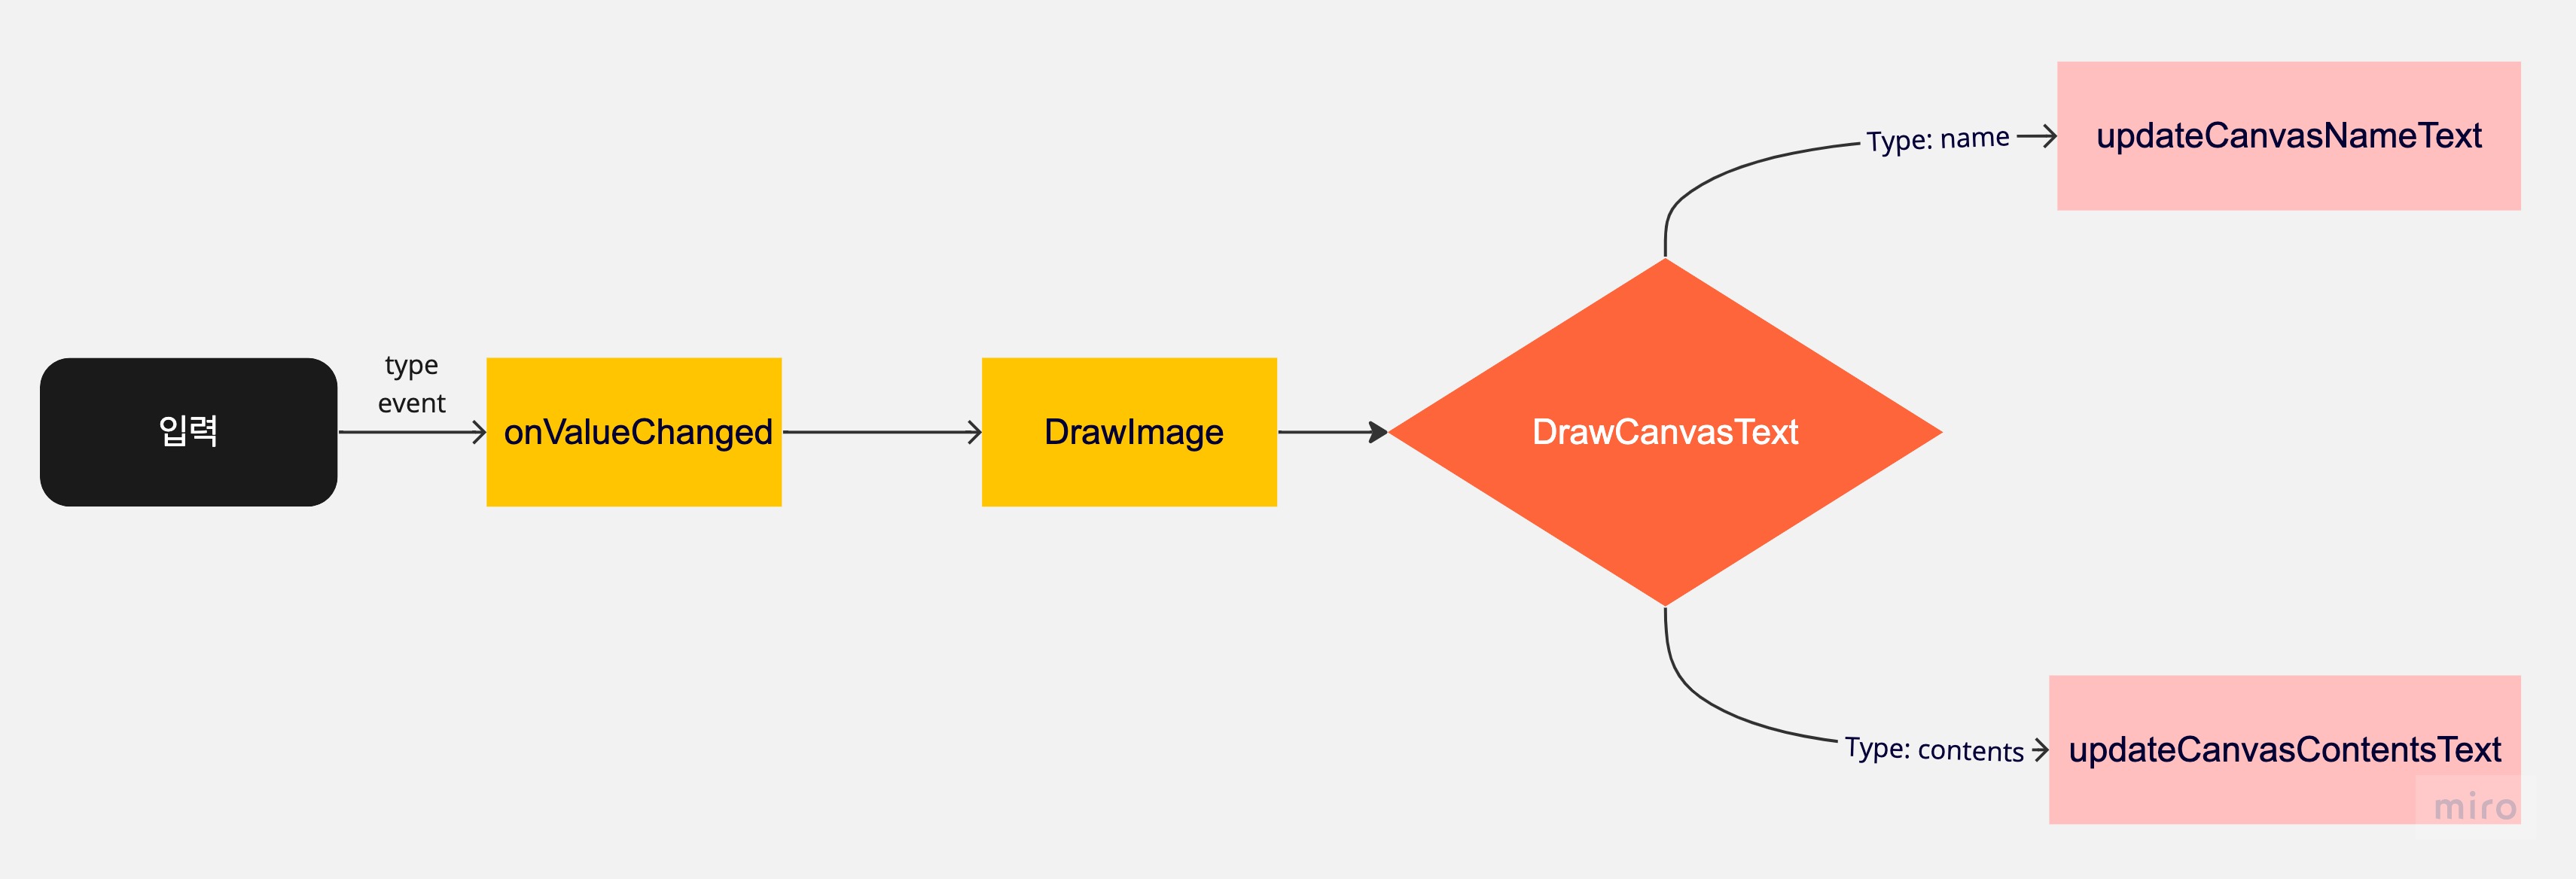
사용자가 input에 값을 입력하면, 입력할 때마다 onValueChanged 함수가 실행된다.
- onValueChange 함수는 줄바꿈의 수와, maxLength를 체크해 입력을 제한하는 역할을 한다.
-
drawImage 함수는 이미지가 없으면 이미지를 로드하고, 이미지가 있으면 drawCanvasText를 실행한다.
3.drawCanvasText 함수는 inputs을 순회하며 공통 스타일에 대한 처리를 하고, type에 따라 updateCanvasText 함수를 실행한다.
updateCanvasText
updateCanvasNameText(text) {
  const style = this.getNameInput.style;

  const { canvas } = this.$refs;
  const ctx = canvas.getContext('2d');

  const lines = text.split('\n');
  // 행 간격
  const lineHeight = this.commonStyle.fontSize * 1.5;
  // x 좌표값 조정
  const x = 165;
  // y 좌표값 조정
  const y = 75;

   // 회전 각도 (라디안)
  const angle = -Math.PI / 20;

  // 현재 컨텍스트 설정 저장
  ctx.save();
  // 회전 중심 좌표 설정
  ctx.translate(x, y);
  // 지정한 각도만큼 회전
  ctx.rotate(angle);
  ctx.fillStyle = style.fontColor;

  lines.forEach((line, index) => {
    const yCoord = index * lineHeight;
    // 회전한 각도에 따라 텍스트 그리기
    ctx.fillText(line, 0, yCoord);
  });

  // 이전 컨텍스트 설정 복구
  ctx.restore();
},

updateCanvasContentsText(text) {
  const style = this.getContentsInput.style;

  const { canvas } = this.$refs;
  const ctx = canvas.getContext('2d');

  const lines = text.split('\n');
  // 행 간격
  const lineHeight = this.commonStyle.fontSize * 1.5;
  // 텍스트 전체 높이
  const totalTextHeight = lines.length * lineHeight;
    // 이미지 위에 텍스트를 그리기 위해 조정
  const yStartPosition =
    (canvas.height - totalTextHeight) / 2 + this.commonStyle.fontSize / 2;

  lines.forEach((line, index) => {
    const y = yStartPosition + index * lineHeight;

    ctx.fillStyle = style.fontColor;
    ctx.fillText(line, canvas.width / 2, y);
  });
},- name부분은 x, y 좌표값을 임의로 조정하고, 회전을 주어서 원하는 위치에 텍스트를 그릴 수 있도록 했다.
- contents 부분은 텍스트를 그릴 때, canvas의 높이를 기반으로 텍스트를 중앙에 정렬하기 위해 수직 위치를 계산해서 그릴 수 있도록 했다.
-
canvas에서 text를 스타일링할 때 fillStyle과 strokeStyle을 나눠서 사용할 수 있다. 나는 strokeStyle은 필요하지 않아서 fillStyle만 사용했다.
- fillStyle은 텍스트의 색상을 지정한다.
- strokeStyle은 텍스트의 테두리 색상을 지정한다.
리팩토링하기
- 공통스타일 분리하기
기존에는 font 관련 설정, 정렬 관련 로직이 updateCanvasNameText, updateCanvasContentsText 함수에 각각 중복으로 존재했다.
inputs style에 중복으로 존재하는 부분을 commonStyle로 분리했다.
data() {
    return {
      commonStyle: {
        fontFamily: 'NanumGothic',
        fontSize: 30,
        fontWeight: 'bold',
        textBorder: 'none',
      },
      inputs: [
        {
          id: 1,
          type: 'name',
          label: '이름',
          text: '',
          style: {
            ...this.commonStyle,
            fontColor: '#683617',
          },
          maxLength: 3,
        },
        {
          id: 2,
          type: 'contents',
          label: '내용',
          text: '',
          style: {
            ...this.commonStyle,
            fontColor: '#827255',
          },
          maxLength: 30,
        },
      ],
    };
},drawCanvasText() {
this.inputs.forEach(({ type, text }) => {
if (!text) {
return;
}
const { canvas } = this.$refs;
const ctx = canvas.getContext('2d');
// 공통 스타일 설정 부분
ctx.font = `${this.commonStyle.fontWeight} ${this.commonStyle.fontSize}px ${this.commonStyle.fontFamily}`;
ctx.textAlign = 'center';
ctx.textBaseline = 'middle';
ctx.textBorder = this.commonStyle.textBorder;
if (type === 'name') {
this.updateCanvasNameText(text);
return;
}
if (type === 'contents') {
this.updateCanvasContentsText(text);
return;
}
});
},- 이미지가 있을 때는 그냥 바로 그려주기
onValueChanged(type, value) {
  const input = this.inputs.find((input) => input.type === type);

  if (!input) {
    return;
  }

  // 줄 바꿈 문자('\n')의 개수를 세기 위한 정규 표현식 사용
  const lineBreakCount = (value.match(/\n/g) || []).length;

  // 만약 줄 바꿈 문자가 4개 이상이면, 더 이상 입력을 허용하지 않음
  if (input.type === 'contents' && lineBreakCount >= 4) {
    return;
  }

  // maxLength를 초과하는 경우, maxLength까지만 입력값을 자름
  if (value.length > input.maxLength) {
    value = value.slice(0, input.maxLength);
  }

  input.text = value;

  this.drawImage();
},

drawImage() {
  const { canvas } = this.$refs;
  const ctx = canvas.getContext('2d');

  const img = new Image();
  img.src = require('@/assets/image2.png');

  img.onload = () => {
    ctx.drawImage(img, 0, 0, canvas.width, canvas.height);

    this.inputs.forEach(({ type, text }) => {
      if (!text) {
        return;
      }

      if (type === 'name') {
        this.updateCanvasNameText(text);
        return;
      }

      if (type === 'contents') {
        this.updateCanvasContentsText(text);
        return;
      }
    });
  };
},
기존에는 onValueChanged 함수를 호출할 때 마다 이미지를 계속 로드하고 있는데, 이미지가 이미 있을 경우에는 그냥 바로 그려주는 것으로 리팩토링했다.
drawImage() {
  const { canvas } = this.$refs;
  const ctx = canvas.getContext('2d');

  if (!this.img) {
    // 이미지가 없으면 로드
    this.img = new Image();
    this.img.src = this.getImage;

    this.img.onload = () => {
      // 이미지가 로드되면 그림
      ctx.drawImage(this.img, 0, 0, canvas.width, canvas.height);
      this.drawCanvasText();
    };
    return;
  }

  ctx.drawImage(this.img, 0, 0, canvas.width, canvas.height);
  this.drawCanvasText();
},
배포
간단하게 netlify로 배포까지 완료!